


You're walking back from the grocery store when a small crater on the bonnet catches your eye. A stone has broken through the clear coat and colour, leaving a dark spot no larger than a pencil eraser. It looks harmless, so it's tempting to leave it until spring.
That delay is risky in Ontario. Road salt, wet slush, and repeated freezing conditions can turn exposed metal into a corrosion problem before the chip has had time to become visually dramatic. Good paint chip repair isn't about chasing perfection. It's about cleaning, sealing, and protecting the damaged area before moisture and salt work underneath the surrounding finish.
Why Paint Chip Repair Cannot Wait
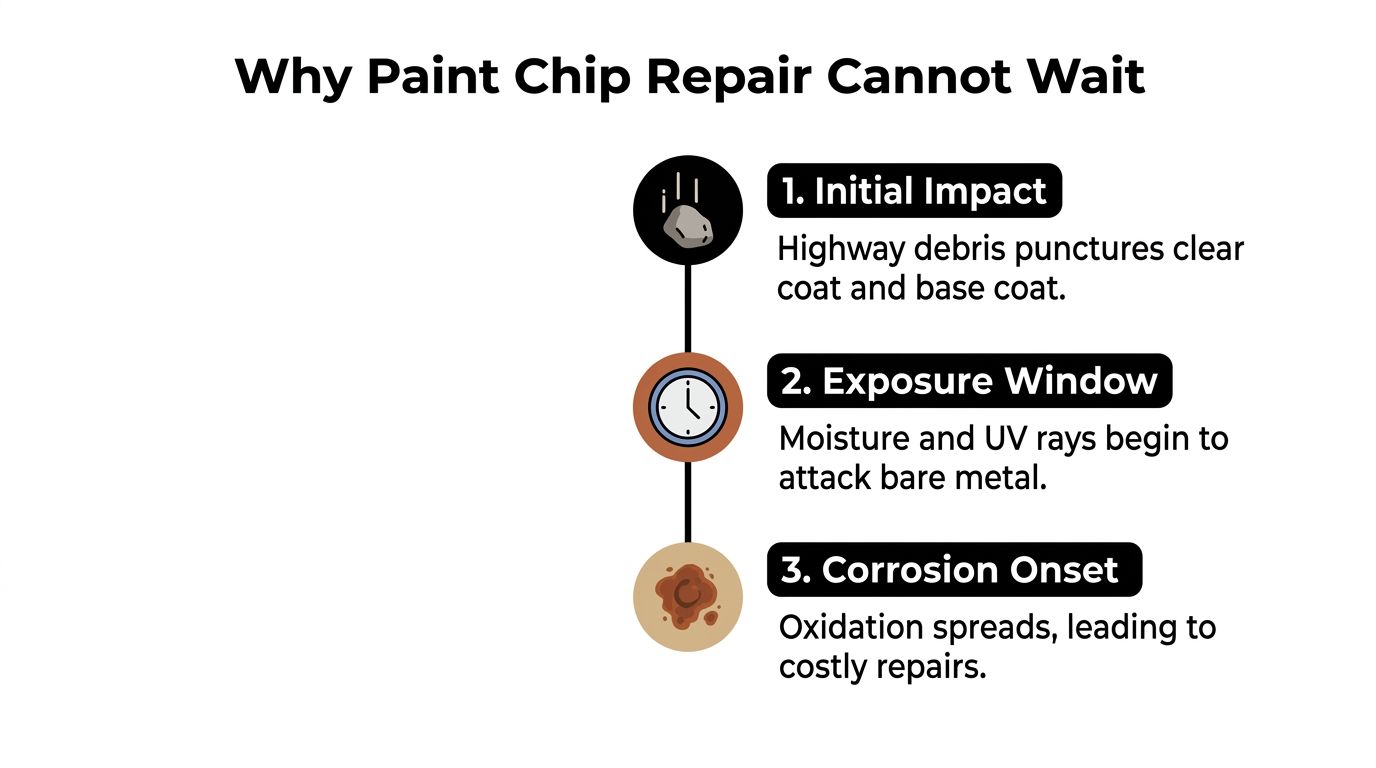
A paint chip is a break in the vehicle's protective coating. If the impact reaches bare metal, water and salt brine can sit inside the cavity rather than run across the panel. Ontario is one of Canada's most salt-intensive winter driving regions, with approximately 5 million tonnes of road salt spread per winter season and 40 to 60 freeze-thaw cycles per year, according to reporting cited by this Ontario paint chip repair guide.
That combination changes the repair timeline. Automotive care guidance for Ontario notes that corrosion can begin within 48 to 72 hours of salt contact on exposed metal, while repeated exposure without washing can produce visible paint damage within weeks, as explained by Hawkeye's guide to Ontario road salt. A chip that appears minor in a dry garage can become a rust point after a few drives through treated roads.
What happens beneath the paint
Salt doesn't need a large opening to cause trouble. Brine reaches the exposed substrate, supports electrochemical corrosion, and repeatedly wets the edges of the chip. As temperatures rise and fall, moisture expands, contracts, and moves through tiny gaps in the damaged coating.
Modern automotive finishes can also be less forgiving of sharp impacts than older finishes because manufacturers use thinner, highly engineered coating systems designed for efficiency, appearance, and emissions compliance. The important practical point is simpler: once the chip reaches primer or metal, the panel has lost part of its barrier.
Practical rule: If you can see bright metal, dark oxidation, or a spreading edge, treat the chip as a corrosion-control job, not just a cosmetic touch-up.
The correct response is to wash the area, remove contamination, address any oxidation, and seal the exposed surface. A small repair completed promptly is usually more manageable than trying to disguise corrosion after it has travelled under intact paint.
Essential Tools and Materials for the Job
A reliable repair kit doesn't need to be complicated, but each item has a specific job. The biggest mistake is buying colour-matched paint and assuming the bottle alone will solve the problem.
Start with the correct coating system
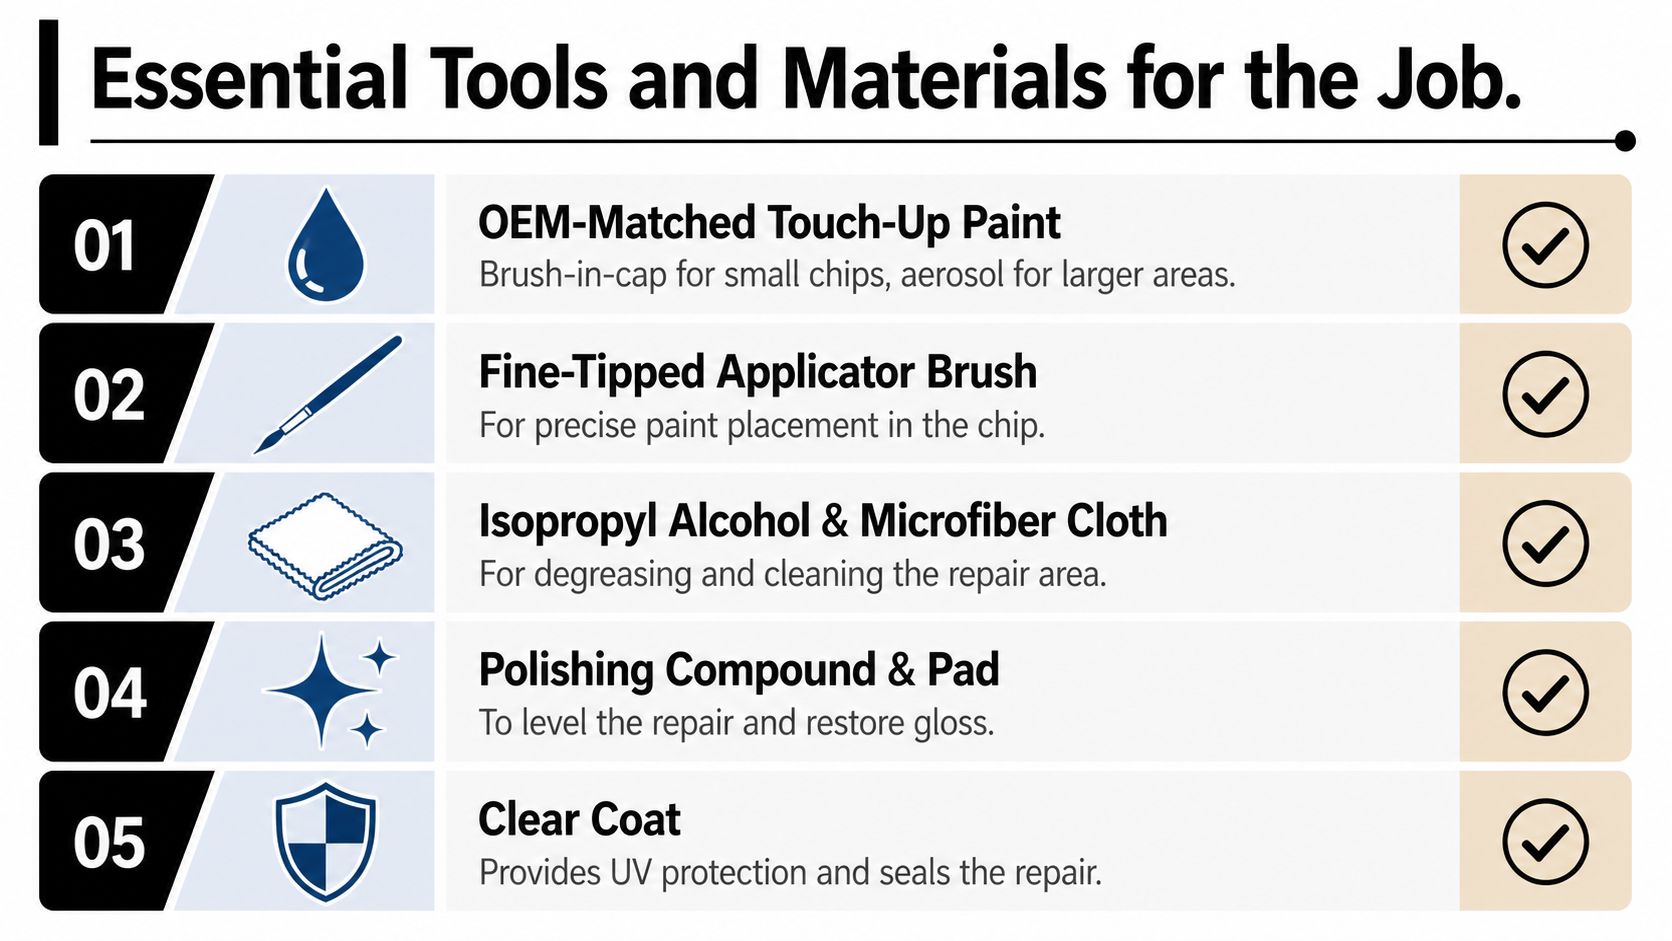
Use OEM-matched touch-up paint based on the vehicle's paint code, not a generic colour name. A brush-in-cap bottle works well for isolated chips because it lets you place a small amount of paint precisely. Aerosol paint belongs on larger prepared areas and requires masking, controlled spraying, and proper ventilation. It's a poor choice for a single tiny impact.
A compatible clear coat can restore the outer protective layer, but it's not always necessary for a very small chip if applying it would create a raised, obvious spot. Metallic, pearl, and multi-stage finishes are less forgiving because the colour effect depends on how the material is applied, not just the colour code.
Prepare and apply with control
Keep these items within reach:
- Wax and grease remover or isopropyl alcohol: Removes wax, silicone, oily residue, and salt film that can prevent adhesion.
- Microfiber towels: Dry the panel without leaving lint or introducing fresh scratches.
- Cotton swabs and wooden toothpicks: Allow you to clean deep cavities and place tiny drops more accurately than a factory brush.
- Fine applicator brush: A small, quality brush controls the amount of paint and avoids flooding the surrounding clear coat.
- Fine wet sandpaper: Use carefully for cured repairs that need levelling. Sandpaper is not a substitute for cleaning.
- Mild compound and polish: Refines the transition after the repair has hardened.
- Nitrile gloves and masking tape: Keep skin oils away from the repair and protect nearby trim.
Household substitutes often create a short-lived visual improvement rather than a durable repair. Nail polish and hardware-store spray paint may have the wrong colour, gloss, solvent balance, or flexibility. They can also react with the factory finish, leaving a ridge, dull patch, or peeling edge.
Paint placement matters more than quantity. A small cavity usually needs several controlled touches, not one overloaded brush stroke.
Surface Preparation Techniques That Prevent Failure
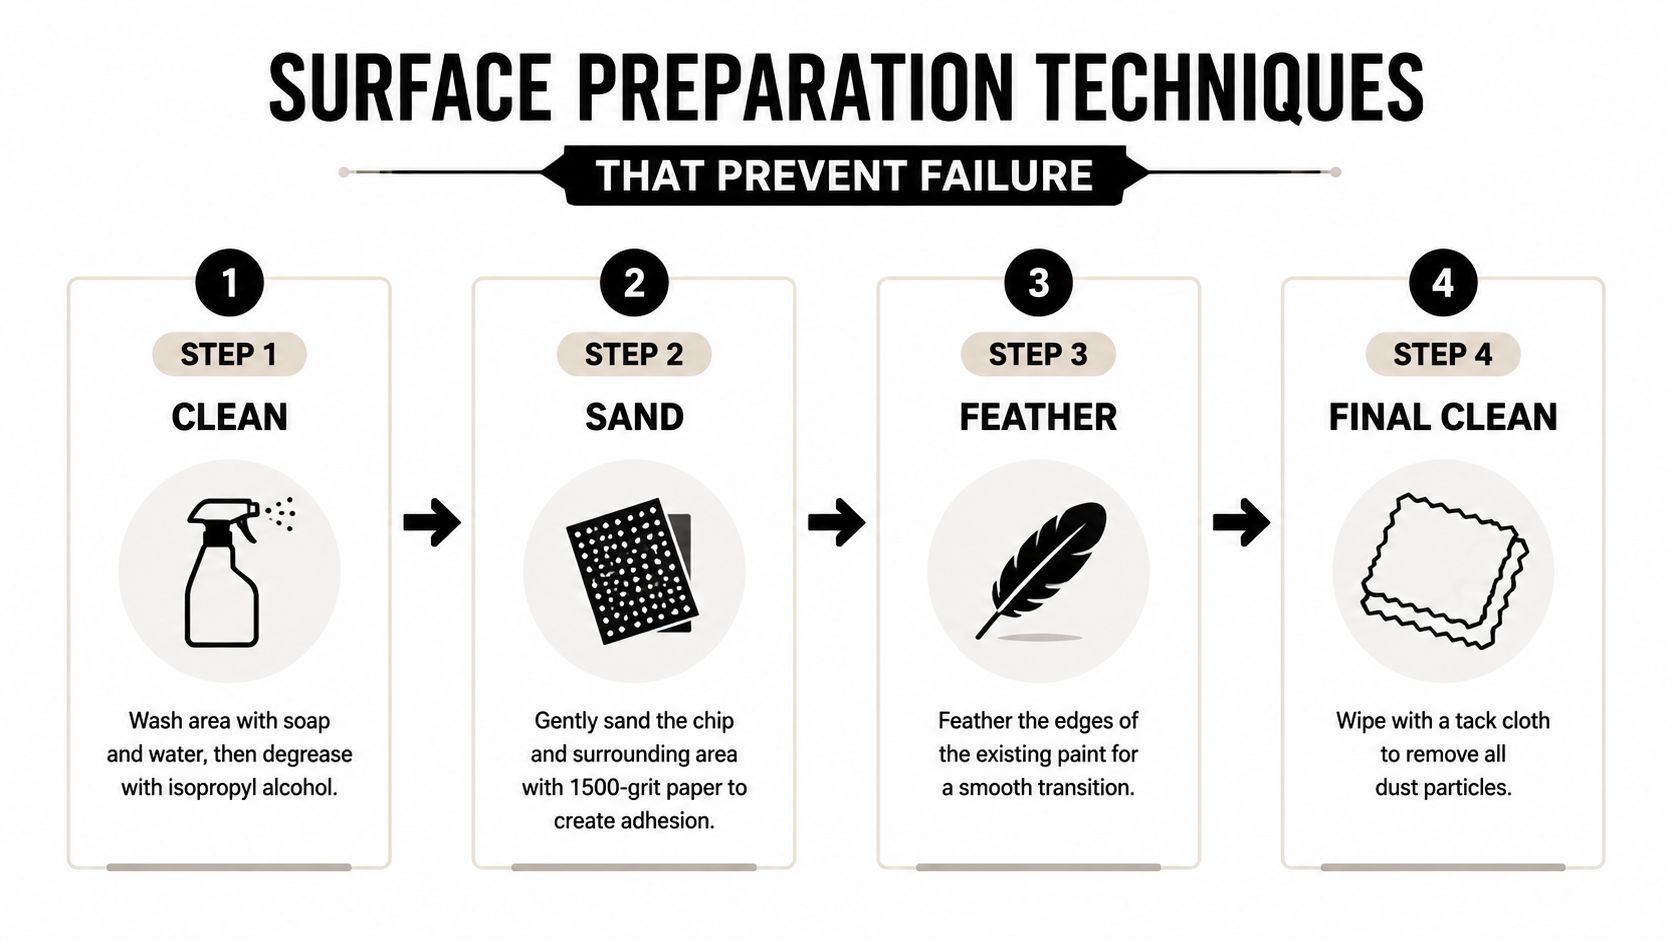
Paint won't adhere properly to wax, grease, road salt, or loose corrosion. Preparation should begin with a normal automotive wash, followed by complete drying. Don't scrub aggressively over loose paint, because surrounding edges may already be weakened.
Run a clay bar over the nearby panel if the surface feels rough after washing. Embedded road film can remain around the impact and interfere with the repair even when the panel looks clean. After claying, wipe the chip itself with isopropyl alcohol on a cotton swab, working into the cavity and changing to a clean swab when residue appears.
Read the damage before choosing the method
Use the chip's appearance and depth to decide how far preparation should go:
- Clear-coat-only damage: The mark looks shallow and the colour layer remains intact. Clean it first, then consider polishing rather than adding paint.
- Base-coat penetration: The coloured layer is missing, but the primer still appears intact. Clean the cavity and apply matched colour in controlled layers.
- Primer or metal exposure: A grey, silver, or dark substrate is visible. The repair needs sealing, and bare metal needs corrosion protection before colour.
- Active corrosion: Orange or brown oxidation is visible, or the edge feels rough and lifts under a careful inspection. Remove corrosion before applying coating.
For light oxidation, a fine abrasive or corrosion-removal pen can expose a sound substrate. Don't enlarge the repair unnecessarily. The purpose is to remove loose rust and unstable material, not to strip a large section of factory finish.
California repair standards reinforce the same technical principle. The California automotive repair equipment requirements include equipment for corrosion protection and application of corrosion-resistant primers, anticorrosion compounds, and topcoats. A chip that reaches bare metal shouldn't be filled with colour alone.
Know when the panel is ready
The cavity should be dry, free of loose particles, and free of oily residue. The surrounding paint should feel firmly attached, with no soft edge that moves under gentle pressure. If you can still see rust dust, feel a greasy film, or pick up debris on a clean swab, preparation isn't finished.
Don't sand the entire bonnet or fender to repair one small impact. Keep the work local, protect the surrounding clear coat, and let the condition of the substrate determine the next step.
Paint Application and Curing Process
Touch-up paint looks easiest to apply when the bottle is in your hand. The difficult part is controlling volume. The factory brush often carries too much material for a small chip, so a fine brush, toothpick, or precision applicator gives better control.
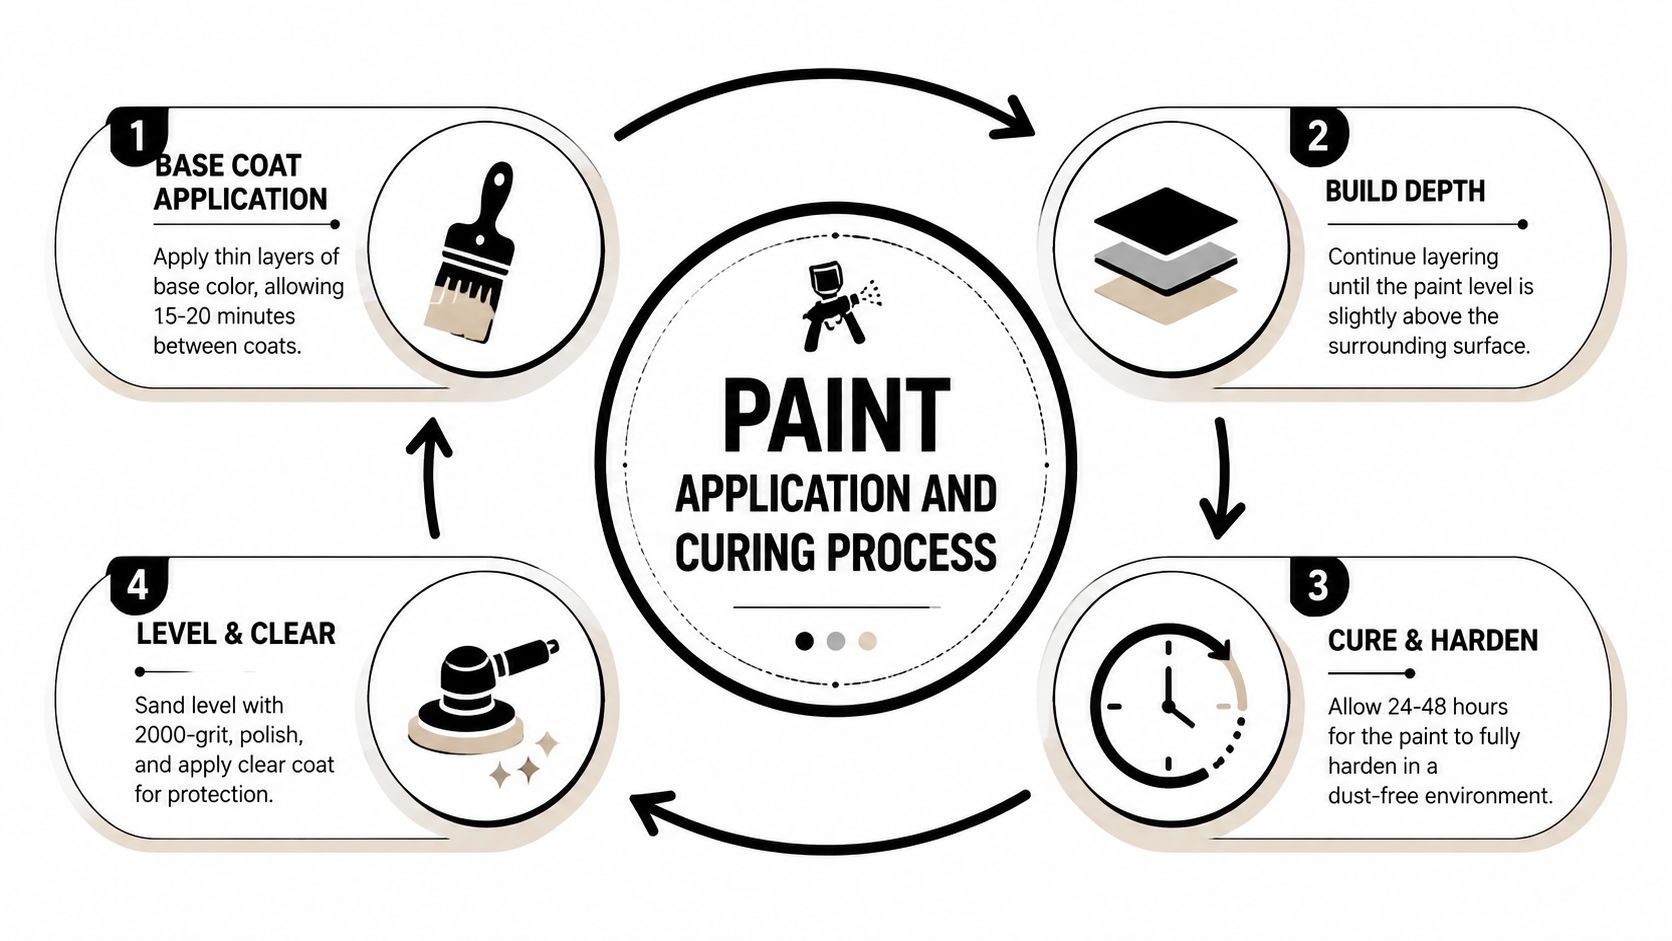
Apply the colour into the cavity rather than brushing across the surrounding finish. Build the repair with thin layers, allowing each layer to settle before adding more. A heavy blob may cover the metal, but it creates a raised edge that catches light and can be harder to level safely.
Build the colour gradually
The first layer should cover the exposed substrate without flooding the recess. Let it dry according to the product instructions, then inspect the coverage under neutral light. If the base remains visible, add another thin layer rather than trying to achieve full height immediately.
The paint should finish close to the surrounding surface, or slightly proud if the repair will later be levelled. That decision depends on the product and the size of the chip. A tiny repair may look better left alone after the colour has settled, while a larger filled defect may benefit from careful levelling.
California's Bureau of Automotive Repair describes accepted trade standards as the basis for good and workmanlike automotive repairs. Its Automotive Repair Standards page also connects refinishing work with controlled preparation, material selection, spray-booth use where required, and coating limits. The listed VOC limits include 540 g/L for adhesion promoters and 250 g/L for clear coatings, so aerosol refinishing isn't a matter of spraying a convenient product outdoors.
Clear coat and final finishing
If the touch-up system calls for clear coat, apply it only after the colour has dried sufficiently. A clear layer that traps solvent can wrinkle, soften, or pull at the colour underneath. For a small chip, use the tip of a fine applicator and place the clear inside the repair rather than spreading it broadly over undamaged paint.
Curing requires patience. Keep the vehicle in a clean, dry environment and avoid washing, rubbing, or polishing the area until the coating has hardened according to the product instructions. Once cured, very fine wet sanding can level a proud repair, but it's easy to cut through the surrounding clear coat.
Finish with a mild compound and a clean microfiber cloth. Stop when the transition is smooth and the gloss matches at normal viewing distance. The aim is a stable, sealed repair that blends into the panel, not an aggressive sanding session that creates a second defect.
Common Mistakes and How to Avoid Them
Most failed touch-ups aren't caused by a lack of effort. They happen because the repairer rushes one stage or uses a material that doesn't belong on the vehicle.
- Applying too much paint: A loaded brush creates a raised mound. Remove excess from the applicator and place small amounts into the cavity.
- Skipping degreasing: Wax and silicone can leave a repair looking complete while the coating remains weak. Clean immediately before application.
- Painting over rust: Colour can hide oxidation temporarily, but it won't stop unstable corrosion beneath the repair. Remove loose corrosion and use a compatible corrosion-control primer where appropriate.
- Choosing the wrong paint code: “White,” “black,” or “silver” isn't a proper match. Metallic and pearl finishes can look different when the flake orientation changes.
- Using coarse abrasives: Heavy sanding scratches the surrounding clear coat and expands the visible repair. Keep abrasion local and use fine media.
- Sealing too early: Clear coat applied over soft colour can wrinkle or disturb the base. Follow the product's recoat guidance.
- Working in poor conditions: Direct sun, cold panels, high humidity, dust, and wind can change how the material flows and cures.
- Treating a large defect like a small chip: Once damage spreads beyond a small isolated cavity, brush-in paint usually can't recreate the factory blend.
If the repair looks worse after the first coat, stop adding material. Let it dry, reassess the surface, and correct the technique instead of burying the problem under more paint.
A simple touch-up is often successful when the chip is isolated, clean, and shallow. It becomes less predictable when the panel has previous refinishing, the damage has sharp lifted edges, or the finish uses multiple colour stages.
When to Choose Professional Repair Services
DIY paint chip repair makes sense for a small, isolated defect on a flat panel, especially when the correct paint code is available and the metal hasn't developed significant corrosion. The repair may not disappear completely, but it can seal the opening and improve the appearance without disturbing a large area of factory finish.
Professional service is the safer choice when:
- The chip exposes substantial metal: Corrosion removal, primer selection, and blending require more control.
- Rust has spread under the paint: The visible spot may be smaller than the unstable area beneath it.
- Several panels are affected: Matching colour and gloss across edges is difficult with a brush.
- The finish is metallic, pearl, or tri-coat: Spray technique and blending affect the final appearance.
- The damage is on a bumper or textured surface: Flexible substrates and textured finishes need the correct materials.
- The chip sits in a prominent area: Bonnet and front-fender repairs reveal uneven texture and colour more readily.
- You're protecting a new or enthusiast vehicle: A professional repair can preserve the finish before further winter exposure.
For vehicles that regularly travel on gravel, motorways, or salt-treated roads, paint protection film is a preventive option rather than a repair. PPF places a transparent protective layer over vulnerable areas and can reduce future stone-chip damage, though it can't restore a chip that already exists.
Insurance can also cause confusion in Ontario. Ontario insurance guidance on scratches and paint damage explains that coverage generally applies to glass stone-chip repairs, while paint damage is usually excluded when it results from wear, weathering, or gradual deterioration. A paint chip claim isn't automatically treated like a windshield chip, so check your policy before assuming coverage.
Carmedics Autowerks Inc provides collision repair and paint protection film installation for Ontario drivers who want the damaged area repaired and vulnerable paint protected before the next season of road debris.
If you've found a fresh chip, don't wait for rust or winter slush to make the decision for you. Visit Carmedics Autowerks Inc for professional paint chip repair, collision refinishing, and PPF options for your vehicle and Ontario driving conditions.