

Before you even think about grabbing a razor blade, let's talk about why that old tint needs to come off. It's not just about your car looking a bit rough around the edges—it’s a real issue of safety and legal compliance. Letting that bubbling, peeling, or faded tint linger can seriously mess with your visibility and attract the wrong kind of attention from law enforcement.
Why Old Car Window Tint Must Go
Knowing how to get tint off your car windows becomes a necessary skill the moment that film starts to give up. The sun's UV rays are relentless, and over the years they break down both the dyes and the adhesive holding the film to the glass. This breakdown shows up in a few classic, hard-to-miss ways.
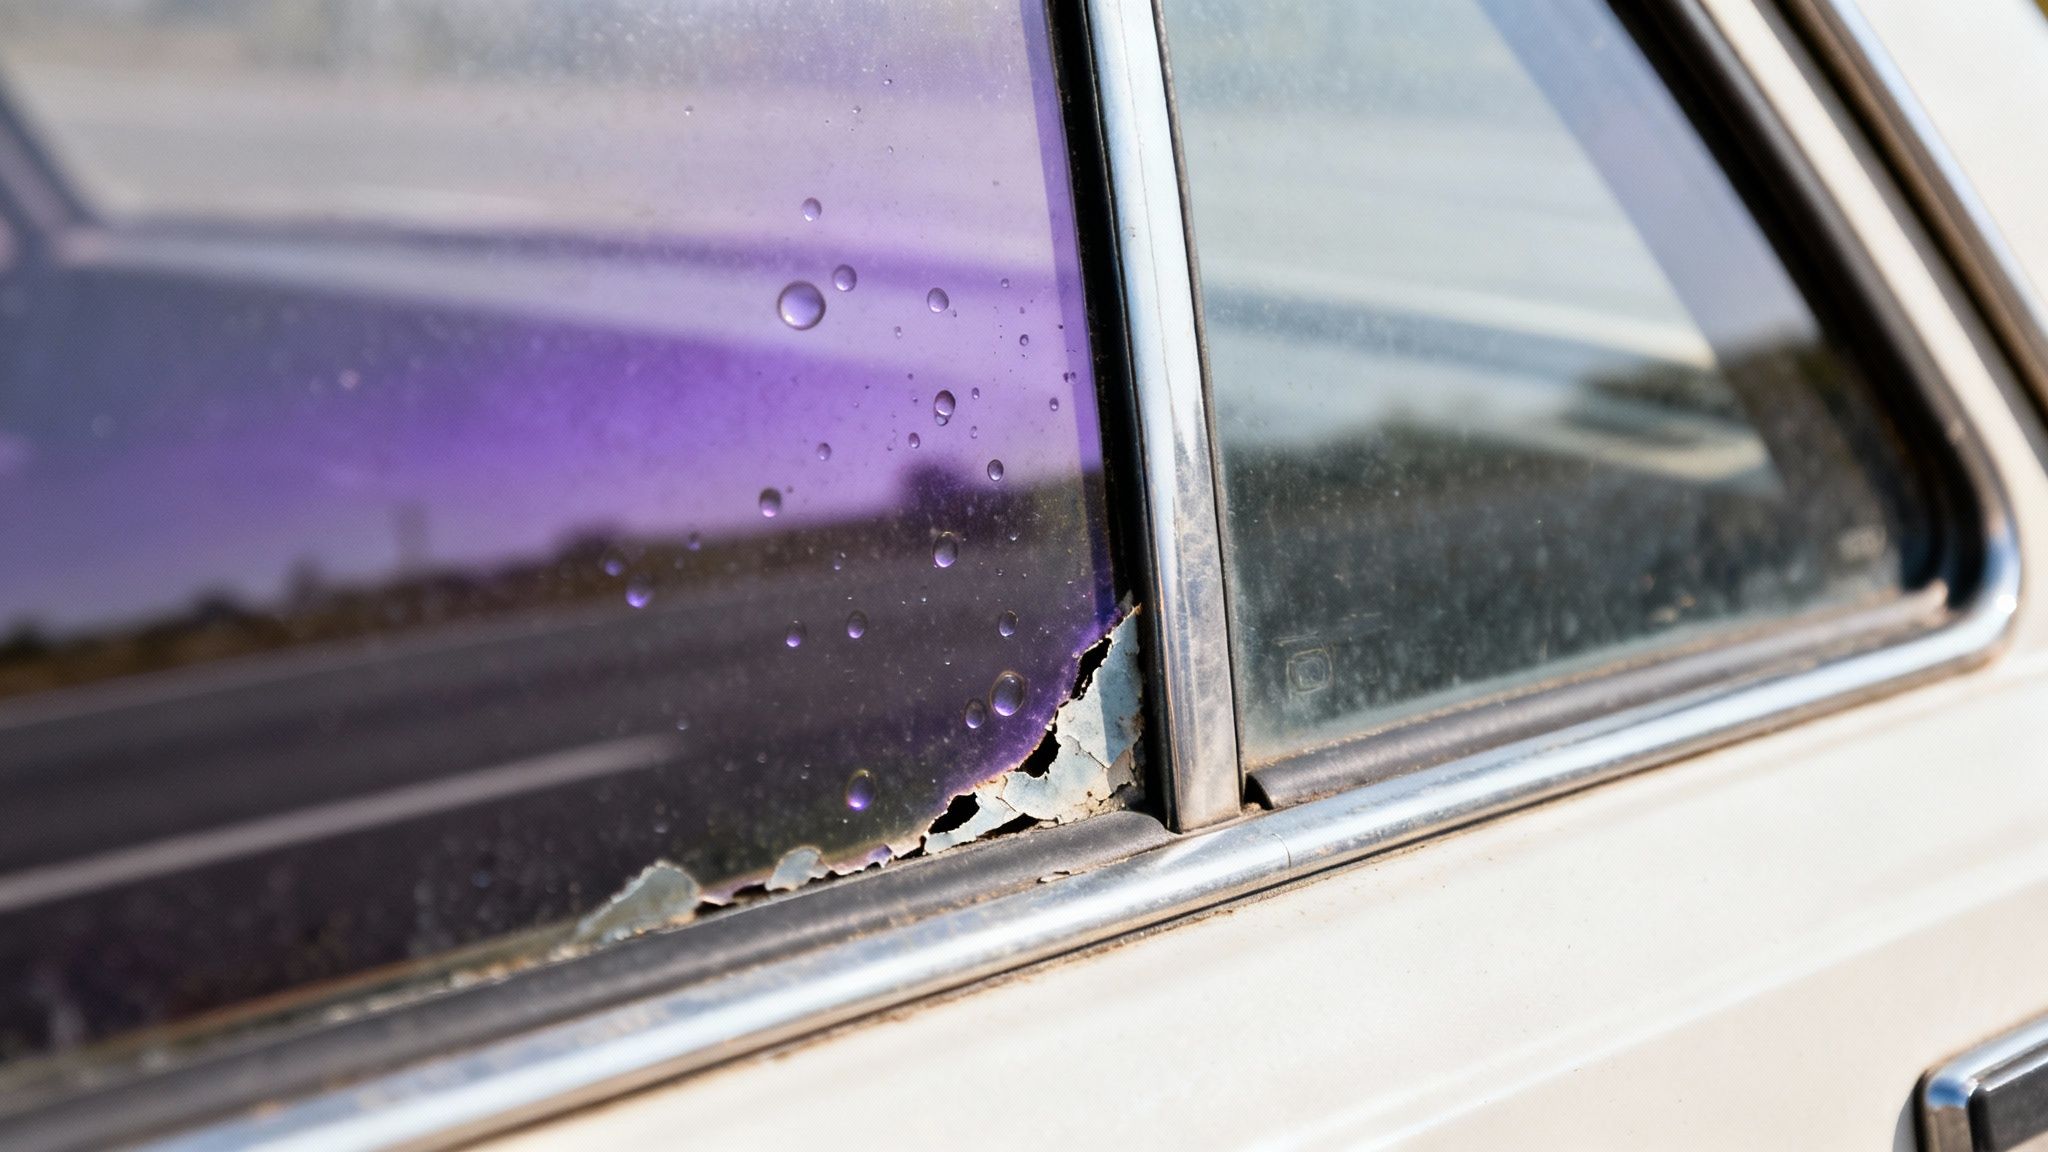
The most obvious sign is bubbling. This is a dead giveaway that the adhesive has failed, creating ugly air pockets between the film and the glass. Those bubbles don't just look awful; they can create weird distortions when you’re trying to check your mirrors or look over your shoulder.
Then there's the infamous purple hue. If your windows have taken on a purplish tint, you're likely dealing with an older, cheaper dyed film. As those dyes degrade, they create that "purple haze," which is a sure sign the tint isn't doing its job of blocking UV rays or rejecting heat anymore.
Peeling Edges and Blocked Views
Once the tint starts peeling away from the edges of the window, you've moved past a cosmetic problem. A loose flap of film can get in your way, snag on the window seal, or even prevent the window from rolling up and down smoothly. It’s a clear safety hazard that you need to deal with right away.
Your ability to see clearly out of every window is non-negotiable for safe driving. Degraded tint compromises that visibility, turning a simple cosmetic upgrade into a genuine risk on the road.
Staying Legal and Avoiding Fines
Beyond the practical issues, there are solid legal reasons to get rid of old or illegal tint. Here in California, for instance, a non-compliant tint is a common reason to get pulled over. The law is specific: front side windows must allow at least 70% of light to pass through. Officers carry tint meters to check this on the spot.
Getting caught often means a "fix-it" ticket and a fine that only gets bigger if it happens again. Removing that old tint is simply a smart financial move. If you're curious about the specifics, you can find more details on California tint laws to make sure you're in the clear.
So, whether your tint is bubbling, peeling, turning purple, or is just too dark, taking it off is the right call. It cleans up your car’s look, restores your visibility, and keeps you on the right side of the law.
Getting Your Tint Removal Toolkit Ready
Before you lay a finger on that old tint, the first real step is getting your gear in order. Trust me, a smooth, clean removal has less to do with elbow grease and more to do with having the right tools for the job. Trying to wing it without the proper setup is a recipe for a sticky, frustrating disaster.
Think of it like any other project—you need the right equipment to get professional results. The right tools can turn what seems like a nightmare job into something you can totally handle on a Saturday afternoon.
What You'll Absolutely Need
Your toolkit really boils down to two main jobs: heating the film to loosen it up and scraping off the gunk left behind. You don’t need an entire workshop, just a few key items that make all the difference.
Here’s the essential rundown:
- A Heat Source: This is your best friend for this project. A proper heat gun or a fabric steamer is perfect. The goal is to apply consistent, even heat to soften up that old adhesive, which lets you pull the film off in big, satisfying sheets instead of a million tiny, infuriating pieces.
- Scraping Blades: You'll want both metal and plastic razor blades in your arsenal. The metal ones are fantastic for the side windows, but you must use plastic blades on the rear windshield. The metal will slice right through those delicate defroster lines, and that's a mistake you can't undo.
- Soapy Water in a Spray Bottle: This is your lubricant. Just a simple mix of water with a few squirts of dish soap will help your blade glide across the glass, which is crucial for preventing scratches when you’re tackling that stubborn, leftover glue.
- Ammonia-Free Glass Cleaner: For the final wipe-down, make sure your glass cleaner is 100% ammonia-free. Ammonia is harsh and can damage any rubber seals or, worse, the defroster grid if any adhesive is left behind.
- A Stack of Microfibre Towels: Don't skimp here. You'll need plenty of clean, dry towels for wiping away residue, soaking up soapy water, and giving the windows a final, streak-free polish.
Don't Forget Your Safety Gear
It might not seem like a high-stakes job, but you’re juggling a heat source, very sharp blades, and slippery surfaces. Taking a minute to put on some basic safety gear is always a smart move.
A good pair of gloves is a must—they'll protect your hands from the heat of the steamer and the sharp edge of the blade. I'd also recommend throwing on some safety glasses to keep any cleaning sprays or flying bits of film out of your eyes.
Having everything laid out and ready to go is half the battle. This table breaks down exactly what you'll need, why it's important, and a little tip from experience to help you get the job done right.
Your Essential Tint Removal Toolkit
Here's a breakdown of the tools you'll need, their main purpose, and a pro-tip for getting the best results.
| Tool | Primary Purpose | Pro-Tip |
|---|---|---|
| Heat Gun/Steamer | To evenly heat the window film and soften the underlying adhesive for easier peeling. | Keep the heat source moving constantly, about 15-20 cm from the glass, to avoid overheating and cracking the window. |
| Plastic Razor Blades | Safely scraping adhesive from the rear window without damaging the defroster lines. | Use a fresh blade for each window; a dull edge requires more force and increases the risk of slipping and causing damage. |
| Metal Razor Blade | Scraping stubborn adhesive off side windows where there are no delicate electrical lines. | Always use it on a lubricated surface (soapy water) and hold it at a low angle to the glass to prevent scratching. |
| Soapy Water Solution | To lubricate the glass for scraping and to help clean up leftover adhesive residue. | Mix a few drops of dish soap into a spray bottle of warm water. The warmth helps break down the adhesive faster. |
| Protective Gear | To protect your hands from heat and cuts, and your eyes from splashes or debris. | Wear snug-fitting gloves for better dexterity when handling the razor blade and peeling the film. |
Once your toolkit is assembled, you're officially ready to tackle the tint.
Using the Heat and Peel Removal Method
Alright, this is where the real work begins. If you're going to tackle this yourself, the most reliable method I've seen over the years is heat and peel. The whole idea is to use gentle, consistent heat to soften the tint's adhesive. Do it right, and the film will come off in big, satisfying sheets instead of a thousand tiny, infuriating flakes. Patience is the name of the game here.
Your best friend for this job is either a heat gun or a fabric steamer. A hairdryer can work in a pinch, but honestly, most just don't get hot enough or maintain a consistent temperature, which means you'll be there forever. A proper heat gun gives you the control you need to get this done efficiently.
Applying Heat the Right Way
Pick a top corner of the window to start. You’ll want to hold your heat gun or steamer about 15-20 centimetres away from the glass. The trick is to keep it moving. Use a slow, sweeping motion and never, ever let it sit in one spot.
If you focus too much heat on one area, you risk creating a thermal shock. That can crack your window, turning a simple DIY job into a very expensive replacement. The goal is to warm the glass evenly until you feel the adhesive underneath the film start to let go. You'll notice the tint itself becoming a bit more pliable.
This visual guide gives a good overview of the tools and steps for getting the tint off safely.
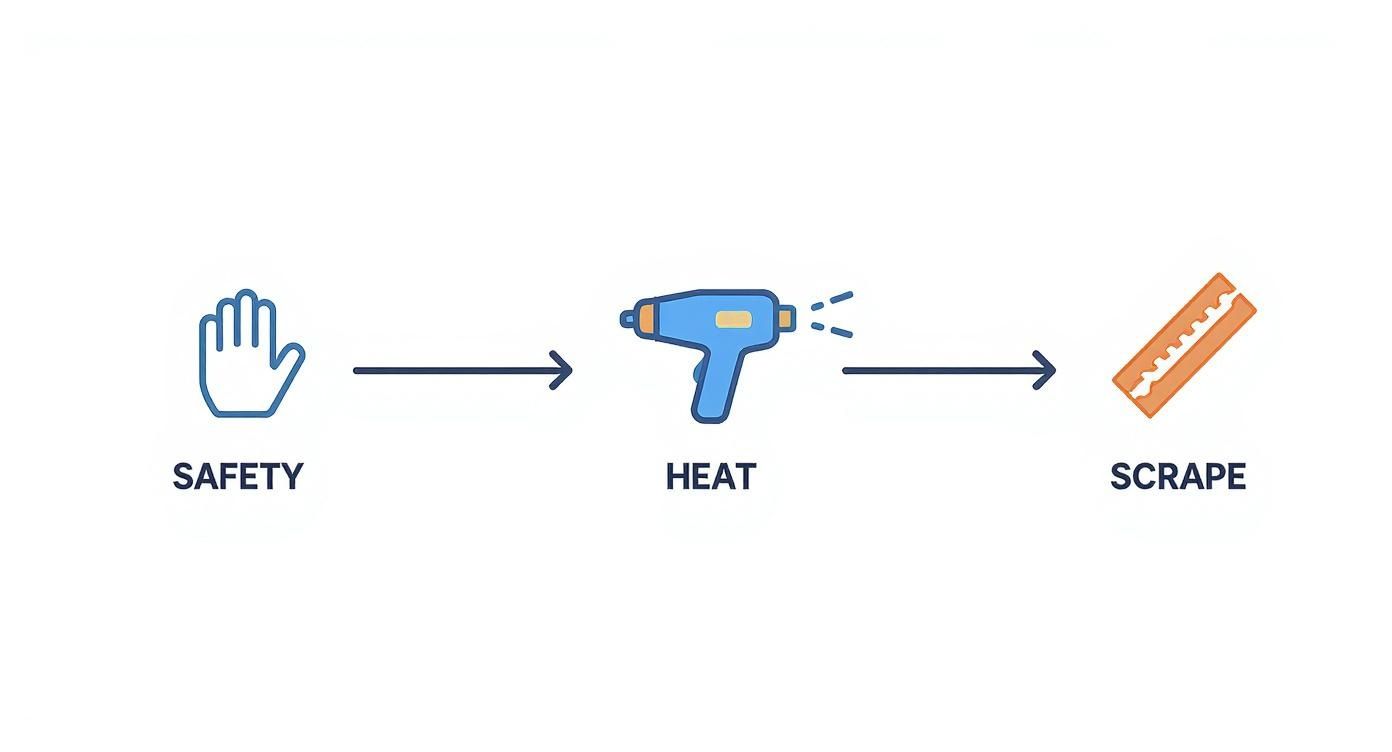
As the infographic shows, it’s a clear process: prep for safety, heat the film, then carefully scrape. Following these stages is the key to a clean, damage-free result.
Mastering the Art of the Peel
After heating a corner for a minute or so, it’s time to see if it’s ready. Carefully use a razor blade to lift just the very edge of the film—enough to get a good grip with your fingers. A standard metal blade is fine for the side windows, but I can't stress this enough: only use a plastic blade on the rear windshield. Those little orange lines are your defroster grid, and a metal blade will slice right through them.
Once you have a corner lifted, put the blade down. Start pulling the film with your hands, keeping the angle low and sharp, almost parallel to the glass. This technique encourages the film to come off with the adhesive, saving you a massive headache later. If you just yank it straight back at a 90-degree angle, the film is far more likely to tear and leave all the sticky stuff behind.
Pro-Tip: As you peel, keep applying heat just ahead of the line where the film is separating from the glass. This "chasing" technique keeps the adhesive soft and cooperative, drastically improving your odds of getting the whole sheet off in one piece.
If the film rips, don't get frustrated. It happens. Just stop pulling, go back with the heat gun to soften that area again, lift a new edge with your blade, and carry on. Rushing is your worst enemy. The slower and more methodical you are, the less glue residue you'll have to deal with. Trust me, patience now makes the final cleanup stage so much easier.
Tackling That Stubborn Adhesive Residue
Getting the tint film off is a great start, but don't spike the football just yet. The sticky, gooey adhesive left behind is often the real battle. This gunk can be incredibly stubborn, smearing across the glass and turning into an even bigger mess if you don't handle it the right way.
The secret to winning this fight is all about using the right combination of lubrication and careful scraping. You want to dissolve and lift the adhesive, not just attack it with brute force—that's a surefire way to scratch your glass.
Choosing Your Weapon: Adhesive Removal Solutions
You've got a few options for breaking down that sticky mess. Each has its pros and cons, so your best bet often comes down to what you have on hand and just how much gunk is left on the window.
- Soapy Water & a Razor: This is the old-school classic. Just spray the glass with a generous amount of warm, soapy water. Let it sit for a minute to soften things up, then use a razor blade at a low angle to gently scrape the residue away. Simple but effective.
- Commercial Adhesive Removers: Products like Goo Gone or 3M Adhesive Remover are purpose-built for this kind of job. They work incredibly well, but make sure you follow the directions and have good ventilation—the fumes can be potent.
- Isopropyl Alcohol: High-concentration (70% or higher) rubbing alcohol can also be your best friend here. It’s a bit less aggressive than some commercial removers but does an amazing job of dissolving most types of tint adhesive.
Pro Tip: Always test any chemical cleaner on a small, out-of-the-way spot first. You want to make sure it doesn't cause any weird reactions with the rubber seals or plastic trim before you go spraying it all over the window.
A Word of Caution: The Rear Defroster Lines
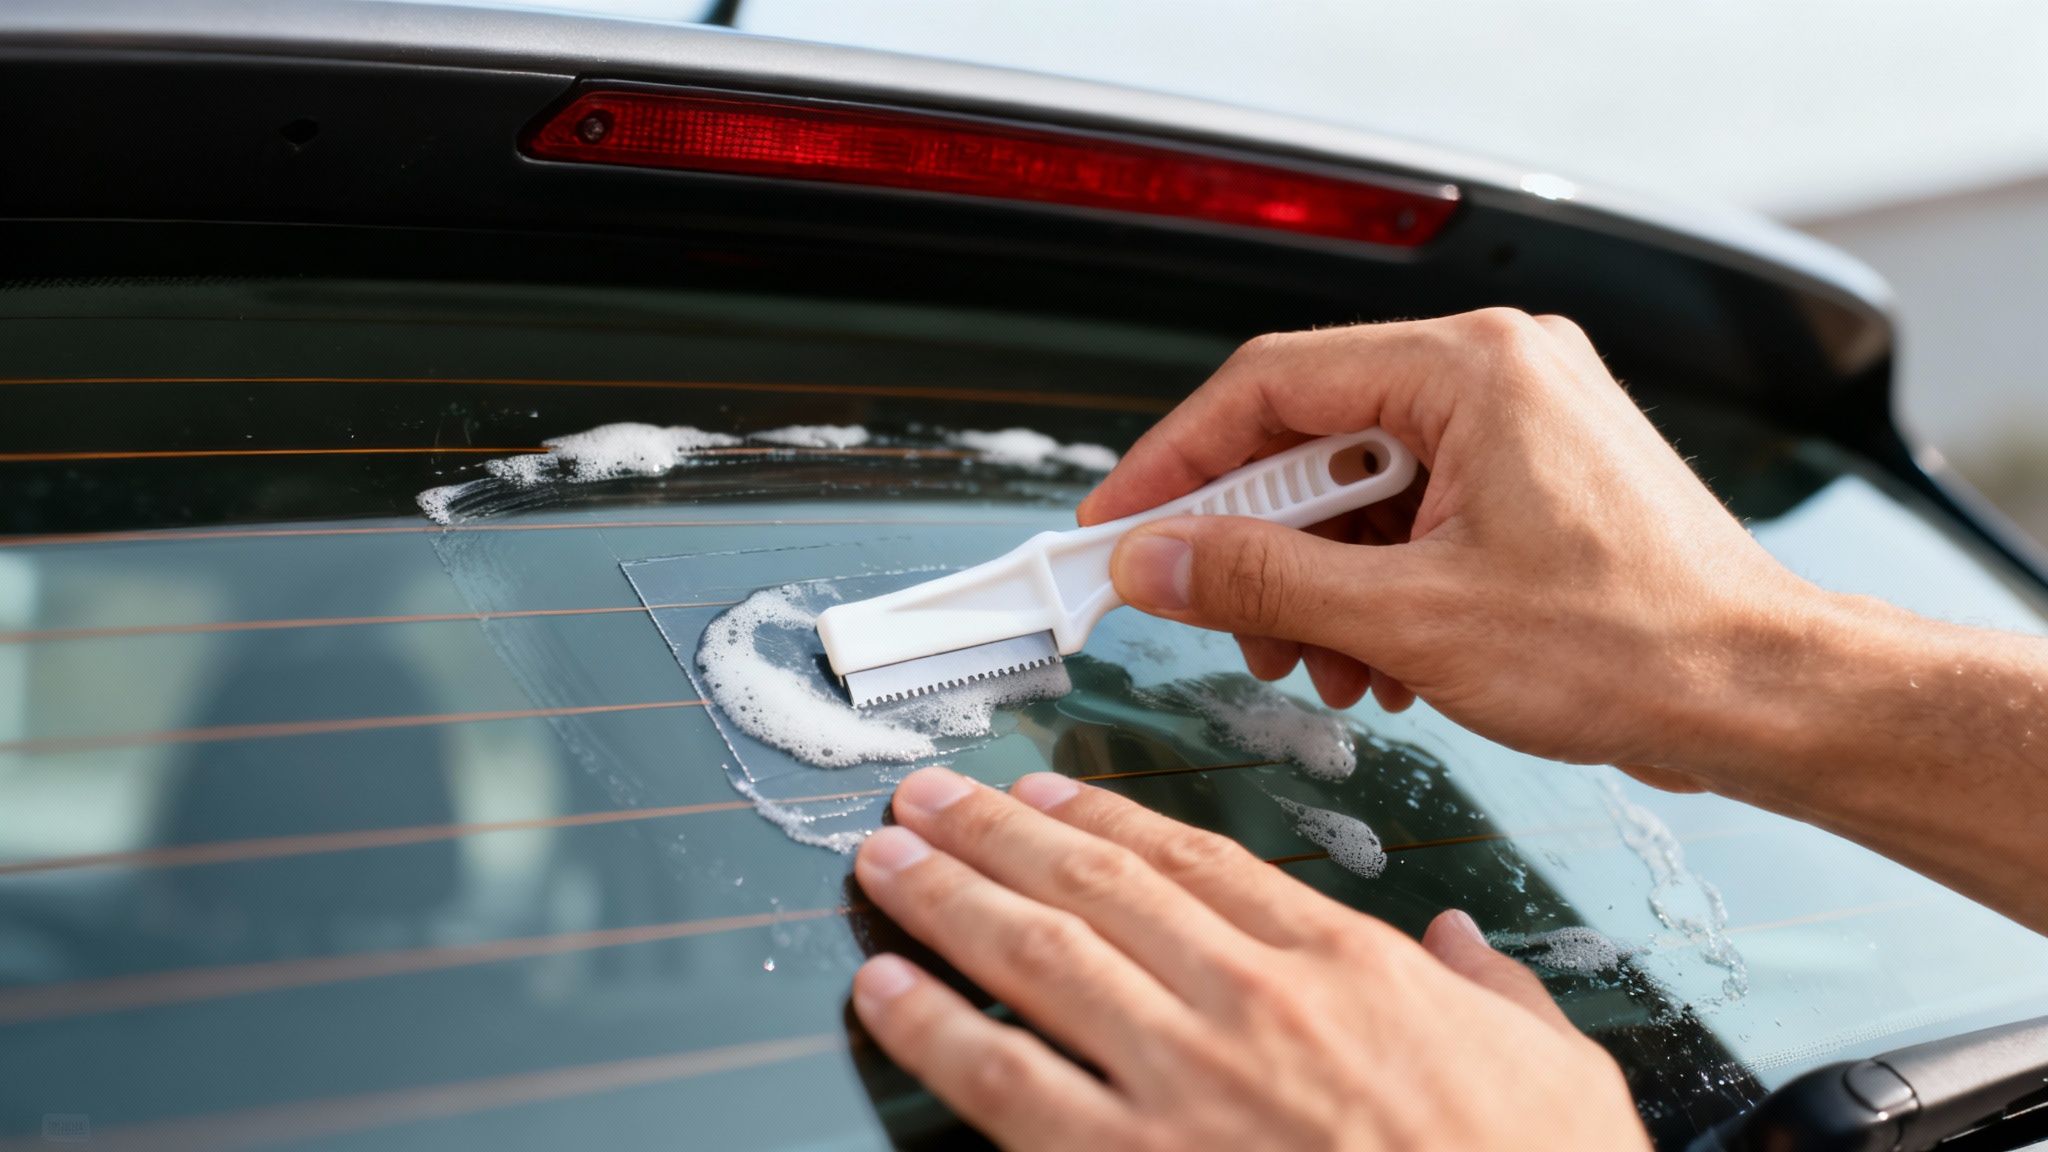
The rear window is a different beast entirely. See those thin, horizontal lines? That's your defroster grid, and it's incredibly fragile. A metal razor blade will slice right through them, killing your defroster for good.
When cleaning adhesive off the rear window, you absolutely must use a plastic razor blade. Go slow, and only scrape with the defroster lines (horizontally), never up and down against them. Use plenty of soapy water as a lubricant and let the solution do most of the work for you—gentle pressure is all you need.
How tough this part of the job is often comes down to the age and quality of the tint film, which varies a lot. For instance, films used on vehicles in California can have lifespans anywhere from two to over fifteen years. If you get a ticket for illegal tint, you have to get it off fast, and the difficulty of clearing that adhesive really depends on the film's quality. This is why professional removal can run anywhere from $50 to $150—it’s a labour-intensive process to clean that residue without wrecking something expensive like the defroster.
Once you’ve got the tint and adhesive off, you might get inspired to tackle other projects. A great next step could be to fix oxidized paint and restore your car's shine.
Deciding When to Call in a Pro
Look, I get it. The DIY spirit is strong, and tackling a project yourself can be really rewarding. But when it comes to removing window tint, knowing your limits is just as important as knowing the steps. Sometimes, the smartest move isn't grabbing a razor blade—it's grabbing the phone.
Recognizing the red flags early can save you a world of hurt and a potentially expensive repair bill. Not all tint removal jobs are created equal.
One of the biggest tell-tales is the state of the tint itself. If that film has been baking in the sun for a decade, it can get incredibly brittle. We're talking about tint that doesn't peel, it just shatters into a million tiny, frustrating flakes. This is where the pros have a serious advantage. Their commercial-grade steamers and specialized solvents are designed to break down that ancient, baked-on adhesive in a way a hairdryer simply can't match.
Assessing the Risks and Rewards
The rear window is where most DIY jobs go sideways. Those thin, delicate defroster lines are shockingly easy to sever with a scraper. One wrong move, one slip of the hand, and you've just turned a tint removal job into a rear windshield replacement. If you're not 100% confident you can navigate those lines safely, it’s a no-brainer to call in an expert. The cost of their service is a fraction of what a new back glass will run you.
It's not just about the money. You have to weigh the professional's fee against your own time, the inevitable frustration, and the very real risk of permanently damaging your car.
Legal requirements can also force your hand. In a state like California, with its strict tint laws, getting a "fix-it" ticket is common. Data shows that 20-30% of cars in major Californian cities might have aftermarket tint, and a lot of that will need to come off eventually. If you're on a deadline to clear a ticket, you need it done right and done now. A professional guarantees a clean removal that will pass inspection. You can discover more insights about California's unique tinting market on KBB.com.
When Professional Help Is the Best Choice
So, how do you make the final call? Ask yourself a few honest questions:
- Is the old tint flaking and falling apart just by looking at it?
- Does the thought of working around those rear defroster lines make you nervous?
- Do you realistically have the time and patience for a project that could take several hours?
- Are you dealing with a high-end film, like a ceramic tint, that might have a stronger adhesive?
If you found yourself nodding "yes" to any of those, calling a professional is almost certainly the right move. And while you're at it, if you're thinking about what to replace it with, it's a good time to research if ceramic tint is worth it for your needs, as different materials behave differently during installation and, eventually, removal.
Your Window Tint Removal FAQs Answered
Even with the best instructions, you're bound to have questions pop up when you're in the middle of a project like this. Removing car window tint isn't just about peeling and scraping; it’s knowing how to handle the little curveballs that can make or break the job. Let's run through some of the questions I hear all the time so you can walk into this project with confidence.
Getting these details sorted out beforehand can save you a ton of time and keep a small hiccup from spiraling into a real headache. It’s all about working smarter.
Can I Use a Steamer Instead of a Heat Gun?
You bet. In fact, a lot of the pros I know actually prefer a good fabric steamer over a heat gun. A steamer gives you a moist, even heat that’s often much gentler on the glass, and it works wonders for softening up that old, stubborn adhesive.
The steam gets right into the film and loosens the glue without creating those intense hot spots that could, in a worst-case scenario, crack your window. The trick is to work in small, manageable sections. Just apply the steam until you see the film start to lift, then start peeling. Easy does it.
Will I Wreck My Rear Window Defroster?
This is probably the biggest fear people have when tackling this job themselves, and honestly, it's a valid concern. Those thin defroster lines on your back glass are incredibly delicate and easy to damage if you're not careful.
The good news? It's completely avoidable if you use the right technique. Here’s how you keep those lines safe:
- No metal blades. I can't stress this enough. Never, ever use a metal razor on a window with defroster lines. A plastic blade is the only way to go.
- Scrape with the grain. Always move your scraper horizontally, following the direction of the defroster lines. Never go vertically across them.
- Skip the ammonia. Certain chemicals, especially ammonia, can eat away at the electrical connections over time. Stick to a safer, ammonia-free cleaner.
The single best tool you have here is patience. The cost of replacing a rear window and a busted defroster is way higher than the few extra minutes it takes to be slow and careful.
How Long Does This Actually Take?
Let's be realistic. If you've never done this before, plan on spending about 2 to 4 hours per window. This is not a quick half-hour job you can squeeze in before dinner.
A few things will affect your timeline:
- The Tint's Age: Old tint that's been baked by the sun for years gets brittle and will fight you every step of the way.
- Film Quality: Cheaper, low-quality films are notorious for leaving behind a ton of sticky residue, which adds a lot of cleanup time.
- Your Learning Curve: The first window will be the slowest. You'll definitely pick up speed as you move on to the next one.
Don't rush it. Trying to power through is the surest way to leave behind a gooey mess or, even worse, scratch your glass. I always tell people to block off a weekend afternoon so they can work at a steady, unhurried pace.
What’s the Best Way to Clean the Windows When I’m Done?
Once all that film and gunk is gone, the final cleaning is what gives you that perfect, factory-clear finish. Don't cut corners here, because any leftover haze or streaks will make all your hard work feel pointless.
Grab a quality, ammonia-free glass cleaner and two fresh microfibre towels. Use the first towel to spray and wipe down the glass, getting rid of any last bits of residue. Immediately follow up with the second, completely dry towel to buff the glass until it’s crystal clear and streak-free. That final polish makes all the difference.
If you get partway through and decide the job is bigger than you bargained for, our team can help you find the best auto tinting near me for a perfect, professional finish.
For expert window tinting services, paint protection, or any auto repair needs in Whitby, Ontario, trust the professionals at Carmedics autowerks inc. Our experienced team ensures your vehicle looks its best and is protected for the road ahead. Visit us online to learn more or to book your appointment.
